Posts
Basic HTML Exercises
- Create opening and closing tags for: <html>, <head>, <body>
- Create a H1 heading
- Create a H2 heading
- Create paragraph text
- Create a style tag in the head section and apply CSS styling to your document (internal CSS)
Body
The visible part of the HTML document is between <body> and </body>
<body>
</body>
Head
The metadata of a website is in the head element.
<head>
</head>
Links
<a href=”https://www.rmit.edu.au”>RMIT University</a>
Internal CSS:
<head>
<style>
body {background-color: powderblue;}
h1 {color: blue;}
p {color: red;}
</style>
</head>
Colours
Colours can be expressed by name, hex code, RGB values and more.
<head>
<style>
body {background-color: powderblue;}
h1 {color: blue;}
p {color: red;}
</style>
</head>
Learn about colours on W3Schools
Click this link for example colours by name and hex code.
Fonts
<head>
<style>
h1 { color:#ff6347; font-family: Roboto, Helvetica, sans-serif; }
h3 { color:#FF8C00; font-family: ‘Open Sans’, Helvetica, sans-serif; }
p { color:DarkOrange; }
</style>
</head>
Introduction to fonts on W3Schools
Test Your Skill
Try the tests below on W3 School to see how well you comprehend HTML and CSS.
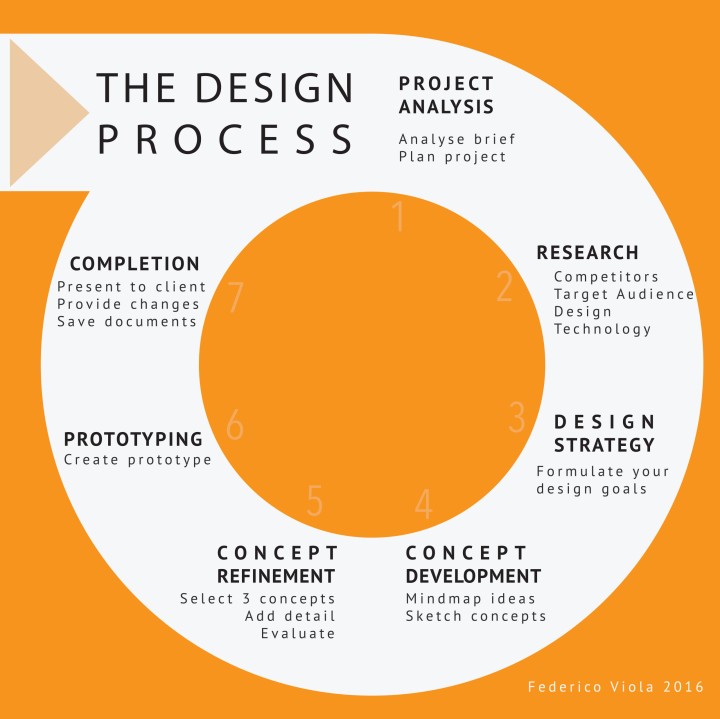
The Design Process
The design process can also be referred to as design methodology. It basically refers to a number of steps that a design can be broken down to from the initial idea or client request to the final printed end piece or manufactured prototype.
There are several trends to create a streamlined step-by-step approach, but it is not chiseled in stone. You can look at my preferred method and modify it for your needs.
I have based mine on my practice, research and education and it is working well for me. A great source of inspiration was the Double Diamond or the 4Ds developed by the British Design Council. The 4Ds stand for discover, define, develop and deliver.
The design process below is particularly suitable to communication design, but works for other design disciplines as well.
Here are the 7 steps:
- Project Analysis or Project Considerations
- Research
- Design Strategy
- Concept Development with Evaluation
- Concept Refinement with Evaluation
- Prototyping or Modelmaking
- Delivery and Completion
-
Project Analysis or Project Considerations
The first step is to define the problem or the request for a design. Either you are approached by a client or alternatively you may get your hands on a brief through a competition or by your teacher.
- Your first step has to be to analyse what the client needs and define a written brief. So, you need to write a short description that lists, what is required, what materials are needed, who it is for and by when it is needed. So, list the problem and what you need to design as well as dead lines or due dates.
- Next you need to create a project plan or action plan. This is a list of each task, with a task description, allocation (who will do the task), due date and a tick box. The allocation column is not necessary if you work on your own and complete all the tasks on by yourself.
- You should also include a section on potential problems in this project. This could be a mind map and it should allow you to see any complications early. An example could be the stability of a desk based yearly calendar, or the wear and tear of an exterior.
-
Research
The research stage is your attempt to learn about the design that you are about to create. You want to research these 3 stages as a minimum: competitors, target audience (or target market) and design and technology.
Competitor Research
After establishing what product (or service) you are designing for your client, find 3 or more competitors that offer the same or a similar product or service. It is good to look at a market leader as well as competitors at a similar level to your client. This can start of as a brain storm of all competitors that come to your mind or a search of similar businesses online. You may want to find competitors via an online business directory, e.g.: www.truelocal.com.au or by using Google. If you are not aware of many online business directories try a Google search for ‘business directory’.
You can document your brainstorm in form of a mind map and your research in form of a page including:
- short description of the competitor
- images of their products
- logo of the competitor or product
- other aspects of their visual identity (e.g.:colours, fonts, etc.)

Target Audience Research
When you are setting out to understand and define a target audience you are looking to recognise why this group or individual person is seeking out your client’s product or services. By understanding a target audience you understand their needs, desires and interests in a particular product. This is central in designing a product or service. We are trying to understand a target audience by looking at data of that group. These are typical criteria to collect data by:
- demographic (measurable data: age, income, gender, culture, language)
- psychographic (personality-related data: life style choices, hobbies, interests, political agenda, cultural traits)
- customer needs
- customer desires
- frequency of use
- geographic location
Below you will be introduced to different tools you can use to collect data:
- mind mapping – a good starting point, mind map the various aspects of the target audience
- target audience list – filling in a list of criteria related to the target audience
- moodboard or visual board – this is fun: put everything related on a sheet of paper or into a digital presentation
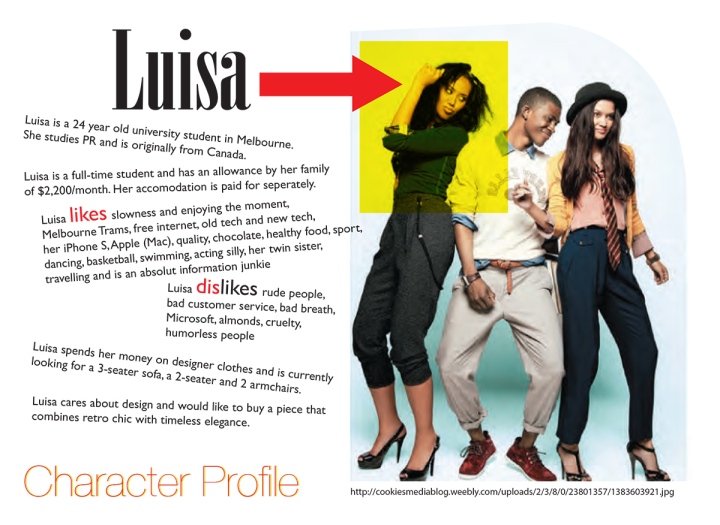
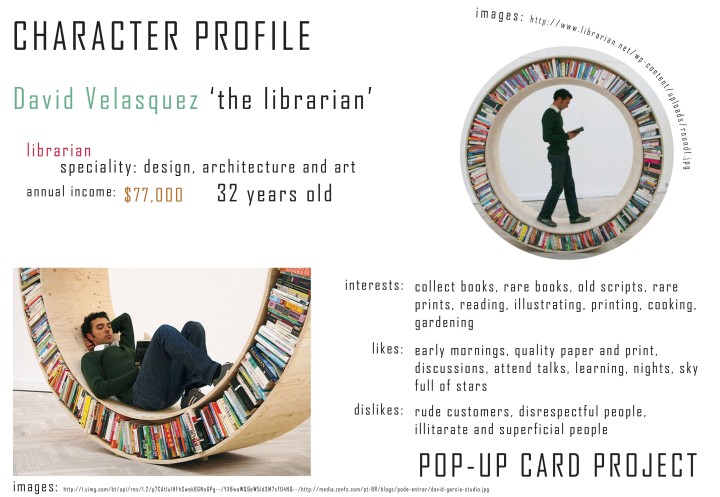
- character profile – this needs to be representative of a typical person in the target audience, preferably a common personality or a leader, see examples below
Finding information about a target audience might mean to actually listen in on your target audience. You can create specific discussion groups with participants of the correct demographic (age, gender, etc.) and psychographic (interests, political persuasion, etc.) profile. You can search online for chat forums or in the comments to related blogs and Facebook is a powerful resource as well.
Design and Technology Research
Design research is the fun part of our research and is where we want to look at inspiration for our design. This can be
- existing products of the type we are about to design as well as
- layouts
- typefaces (fonts) > http://www.dafont.com
- colours suitable to the target audience, product and client business
- textures
- shapes
The technology aspect relates to manufacturing, finishing or prototyping methods used for the product you are designing. It is central to understand the process and materials applied in the making of the product. If you are working on a plastic component to be inserted into a dashboard of a car or yacht you may need to research the plastic manufacturing process (e.g.: injection molding). While if you are designing a pamphlet, you will need to research printing and folding techniques. So ensure to research:
- manufacturing and other technology
- materials
- other aspects
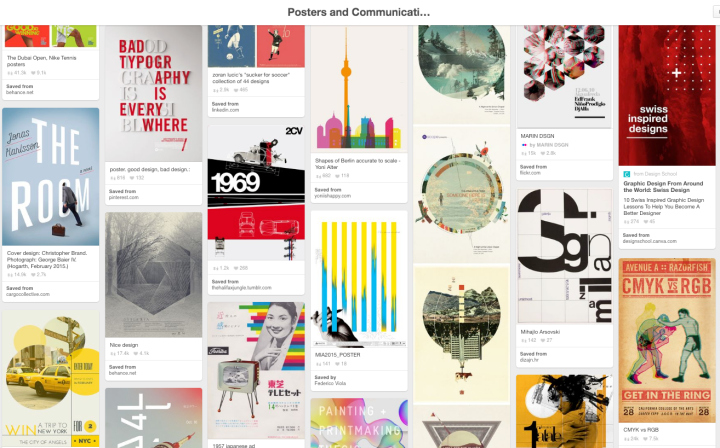
I like to use Pinterest in my research and highly recommend it as it is a fun site.
-
Design Strategy
A design strategy is a written statement that will help you establish what you are setting out to design. It is your chance to reflect on your analysis and research and now clearly state what your intended design strategy will be. Make sure to relate your strategy to your design ideas and link it to your research and brief.
Example: ‘I will set out to design a poster for the MUFF (Melbourne Underground Film Festival). I will use vector graphics to show a group of festival goers waiting in a lobby. They will all look eclectic and wear some retro-style clothes. The font needs to work with the MUFF logo. The poster will have a retro appeal, but look contemporary. I want to avoid designing a poster that looks dated. The layout will have a clear visual hierarchy and good use of white space. The colour scheme needs to be decided.’
You see that the design strategy is a method to plan your design, but needs to link your ideas to the brief and research. Your design strategy may be a work in progress and you may not conclude every aspect. It is a bit a cooking recipe for a design. Incorporate problems or difficulties with this project as you may have found in your Project Analysis.
-
Concept Development
Now you can get creative by developing concepts or ideas. The preferred method is the sketching of thumbnails on paper. Use pencils or fine liners to sketch out your concepts. You need to create a large number of ideas. Do not limit yourself to only your first few ideas, but use brainstorming, mind mapping and other creative thinking tools to come up with creative and unorthodox concepts. I would develop a minimum of 30 thumbnail sketches.
-
Concept Refinement with Evaluation
Select 3 of the most suitable and promising concepts. You may select them yourself or get the feedback of a colleague or the client. Refine the concepts by exploring variations for layout, fonts, scale, colours and shades, as well as image choices and finishes. Always include a colour scheme (options of colours) and font choices.
- Depending on the product you may create 3 mockups to give a feel for the product.
- Present your 3 refined concepts to your design team and client for evaluation and feedback. Choose the preferred concept.
- You may create a style guide that clearly defines the different aspects of this design (font choices for headers, base text, colour choices, and more)
The evaluation takes your design strategy into account and looks at how well each design has achieved the desired aspects.
-
Prototype or Modelmaking
Create a to-scale prototype in the correct finish and finalise your design.
-
Completion
Finalise all the paperwork and files. Support your client and other third party companies with the correct information, files and support.
- Ensure the manufacturer or printer is completing the job (e.g.: by signing off a test print)
- Save all files into correct folders. Store the files.
- Finalise all invoicing and payments.
- Supply your client with all the correct files and instructions.
- Write a completion report
Other Useful Resources
Quicksprout’s How To Define Your Target Audience
The 7 Steps of a Professional Design Process by DesignCrowd
Inspirationfeed’s 7 Design Process Steps Designers Should Follow
Lines and Curves
When you are creating artwork you will use a variety of design elements. The better your understanding of design elements the easier you will be able to communicate with your graphics.
Design Elements
There are a variety of design elements. On basic terms we are referring to any aspect that contributes to the final graphic. Design elements include:
- Dot or Point
- Line
- Shape
- Form
- Value
- Colour
- Texture
The Line
We will focus on the Line and the impact a line can have visually, aesthetically and psychologically. Definition: a line is a path with a beginning and an end. It can be defined as the connection between a start point and an end point. Generally a line has one direction, but that direction can be unclear or ambiguous. Lines are 1 dimensional and can vary in style, thickness, direction and length. A line can be real or it can be imaginary or implied. How we understand a line is directly related to our environment and how we understand our environment. A hunter in the stone age needed to read his environment to ensure his survival and successful hunt. Let us look at some lines based on position in detail.
Horizontal Line
A horizontal line suggests calm and a resting position. Humans and most animals will take a horizontal position when resting . Cows seem to be an exception, they sleep in a standing position. If we relate this to our prehistoric ancestor he would view an animal or a stranger in a resting position as less of a threat. A horizontal line may give the illusion of space. In a landscape the horizontal line goes from left to right and suggests continuation of the landscape to both sides. Vertical lines in repetition emphasise stability. Vertical lines have a relaxing effect.

Vertical Line
Vertical lines are less stable and give a sense of height. The higher the vertical line reaches the more it can be read as something powerful, heavenly and beyond our reach. Depending on the object vertical lines can give a feeling of change and growth (eg a forest of tall vertical trunks). In architecture the use of vertical lines can give a sense of height and power. Vertical lines can be perceived as a threat, as in a standing person. Our prehistoric ancestor would view strangers and animals in a standing position as awake and potentially aware of his presence. They may even observe him. Vertical lines in repetition can create a strong rhythm. Vertical lines can be perceived as moody.

Diagonal Line
A diagonal line suggests movement. Objects in diagonal positions can appear unstable, either they are about to fall (as in the image of a falling tree) or they are in motion (a sprinter). In an image that shows perspective the diagonal lines depict the highest and lowest point of a row objects receding into the horizon. The line seems to commence with the object in front and recedes to the vanishing point on the horizon. Diagonal lines will draw the viewer’s gaze into the image. Diagonal lines are very powerful and seemingly in motion. Diagonal lines in repetition emphasise movement and can create a strong rhythm. Diagonal lines can be related to chaos and instability.
Combined Horizontal and Vertical Lines
The combination of the two lines will combine elements of the horizontal line with the qualities of the vertical line. A grid will look extremely stable and strong. A low and wide object will appear stable. A high object will appear strong and important. The rectilinear nature of the lines suggest a building or object that has been built and is structurally stable.
Curve
The lines to this point were related to positioning. The curve is related to the flow of the line. When a line is straight it adds little in the form of character or personality to the line. A straight line looks static and the positioning is the only indicator to the position or level of movement. A curve is very different to that. A curve is energetic and implies change of direction or motion. Gentle curves convey slow, gentle movement and remind us of the sensual qualities of a human body. Gentle curves can have a very pleasing and softening influence on a picture. Like the horizontal line a gentle curve can be relaxing, but it is also stimulating. Sharp curves convey fast, abrupt movements. This can be read as chaos or violent movement, like the struggle for victory between a predator and its prey. Sharp curves and twists can give a composition a chaotic and intense feel.


Continuous Lines
Continuous lines refer to lines either as a drawn, printed or as the continuation of the edge of a shape or object. We draw our world with the aid of lines, yet in reality there are no lines, but shapes and objects. There are different types of lines distinguishable by their quality: continuous, broken, dotted, thick, thin, hair lines, light, dark, in colour, even, uneven, etc. Every line is treating a subject in a certain way and therefore has a strong impact on the viewer’s emotions and understanding of the work. Lines can add emphasis and give depth to an object. Read more about the quality of lines at a later post.
Implied Line
An implied line may be a connection of objects or the continuation of a rhythm, it can be the continuation of an arrow or pointer or the path of the direction of someone’s eyes looking. It can be a person pointing at something with the index finger.

Implied lines are very powerful tools of the graphic designer. A psychological study conducted by researchers at the universities of Exeter and Lincoln found that biological cues, such as eye-gazing and finger-pointing were far more powerful to the human psyche than text-based (left, right) or icon-based cues (arrows). The reasons for this may lay in the fact that a biological cue relates to how we may read a person and a person’s body language. A person might pass on important cues to us with their body language. Looking at something may be a hint that was not given intentionally by the sender (of the information). Read more at: Psychology Study Points to Giving Arrow the Finger at University of Lincoln site. Gestures are powerful visual cue used in graphic design and were ever-present in art of many epochs. Renaissance painters like Michelangelo or Leonardo da Vinci placed visual cues into their paintings that were an indication of the artist’s views, it could represent criticism or say something about the subject. Leonardo’s Last Supper depicting the Jesus at his last supper with his apostles. Each of the hand gestures represent a message or code. There are many examples of finger-pointing in paintings, Michelangelo’s famous ‘Creation of Adam’ that can be found in the Sistine Chapel shows God reaching out to touch Adam. He seems to point at him with his index finger.

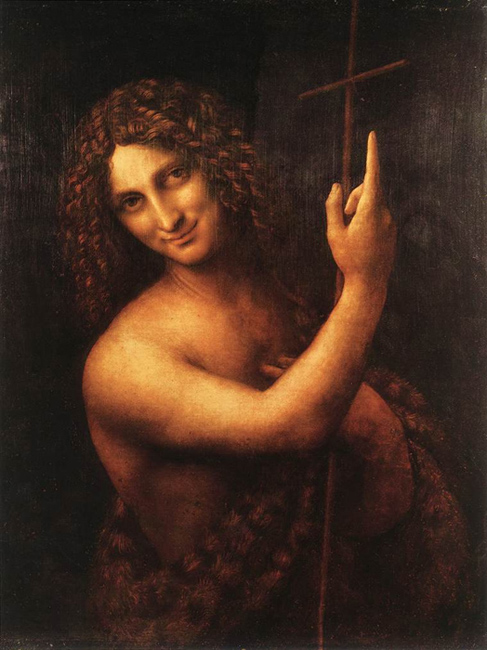
Many paintings show someone pointing towards heaven. This might show the importance of heaven in Christian belief. In Leonardo’s painting of St. John the Baptist it is believed to signify salvation through baptism that John the Baptist represents.
In 1914 a poster design by British designer Alfred Leere featured a picture of the British secretary of state for war, Lord Kitchener, pointing directly at the viewer, above the words “wants you.”
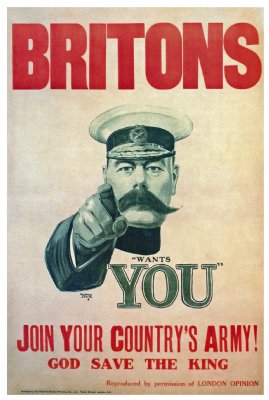
This design carried a powerful message that would stay with the viewer long after seeing the poster. One can only imagine what that poster did to the minds of young men of the early 20th Century. The Leere poster that was released became quite an icon and the concept of the finger pointing at the viewer has been reused in other recruitment posters of WWI and in other designs ever after. The Uncle Sam poster was released in 1916 and became possible more famous in a commercial context.

![The concept was used on the German side as well with this 'Auch du sollst beitreten zur Reichswehr' [You too should join the German Army], design by Julius Engelhard, Image: courtesy of mental_floss](https://classoffederico.files.wordpress.com/2014/04/world-war-propaganda_auch-du-sollst-beitreten.jpg?w=720)

Applying the eye gaze and pointing finger to a design piece can add a clear flow and focus to your design and assist the Visual Hierarchy and message of your work.
Also read:
More on Lines @ RAE, Research and Exploration
10 Top Photography Composition Rules at PM – Photography Mad
21 World War I Recruitment Posters From Around the Globe on mental_floss by Jill Harness
The paper Giving subjects the eye and showing them the finger: Socio biological cues and saccade generation in the anti-saccade task by Nicola J Gregory and Timothy L Hodgson was published in Perception, 2012 , Volume 41, Issue 2, pages 131-147. http://www.perceptionweb.com/abstract.cgi?id=p7085 Who is Emily the Strange? on http://www.emilystrange.com by HumanCat
C1 – Design Simple Webpage Layouts – Week 08

Link to all Weeks Week 3 Week 4 Week 5 Week 6 Week 7 Link to this Unit on MyKangan
Today’s Class
- Assessment – Website
- Step 4 – Create the Website
- Dreamweaver
- Feedback
Assessment Website
Step 4 – Create the Website
Create the website in Dreamweaver (or any other Code editor) using HTML, CSS and if necessary JavaScript or JQuery.
- Your website needs to have a well-designed layout.
- 4 Web Pages:
- Home Page
- About us and Contact
- Gallery or Portfolio of Work
- Bookings or Purchase Requests
Dreamweaver
We will continue using divs (Read up on Divs on W3School) and complete a website in class.
Attend class to learn about how to set up your website in Dreamweaver. You will learn how to create divs, place images, create an interactive menu and more.
How to create an interactive menu:
- Create a menu: Use a UL
- Create a Hover-over menu: Tizag Instructions W3Schools’ Instructions
Feedback
Please leave your feedback in form of a comment. Your feedback and suggestions will help me to make this blog more user friendly. Thanks!
C3 – CSS and Testing Procedures – Week 06
Today’s Class – Web Security Workshop
- Ensure Basic Website Security
- Research These Terms
- Upload the Complete File on MyKangan
- Internet Security
- Protect Fixed Internet Connection and IP Address
- Use and Maintain Antivirus Software
- Protect Shared Network Resources From Intrusion
- Following Security Protocols
- Disable Control Protocol
- NETBIOS and TCP/IP
- Assessment Task
- Feedback
Ensure Basic Website Security
Today we will have to insert a workshop on basic Website security.
This is the unit of competency that we will cover:
Read the units’ elements:
- Determine Business Security Requirements
- Ensure Web Server Security
- Ensure Protocol Security
Research These Terms
Use this link TechTerms.com, Webopedia.com and find your own web dictionary to research the terms below:
- What is a (Web) Host/(Web) Hosting?
- What does ISP stand for?
- Example of 2 free hosting services (provide links)
- What is FTP?
- What is a Domain name?
- Explain IP Address and give an example!
- What is the difference between a static and a dynamic IP address?
- Find and list prices for a domain name made up of your name on http://who.is/
- What is the difference between a server and a PC?
- What is a Web Server?
- What is a Gateway?
- Give an example for a Gateway.
- What is the purpose of a Firewall and where is it located?
- What is meant by Malware?
- Give 3 examples for Malware!
- How can you protect your computer against Malware?
Give three examples of software designed to protect your computer! - Define HTTP.
- Define HTTPS. How does it differ from HTTP?
- What is a URL?
- Define SSL.
- Explain the acronym TCP! How does it relate to IP?
Upload the Complete File on MyKangan
Create a new Word Document and insert all your definitions in there with the source of your information. Next upload this as a Day 1 Task on MyKangan in ICAWEB408A-Ensure Basic Website Security.
Visual Example of a Network
Visual Example of a Network connected to the Internet: Example of the Internet displayed as networks.
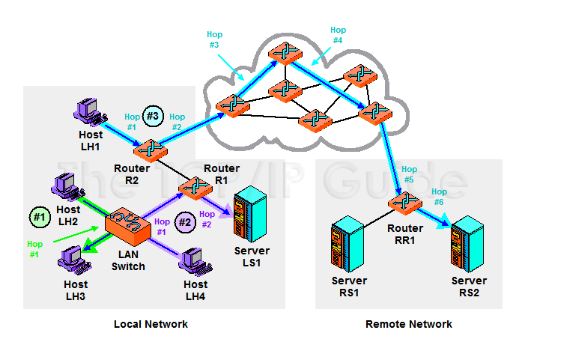
You can view the different routers that your host PC will visit when accessing a Web page:
Launch the command prompt from a Windows-based computer click: Start > All Programs > Accessories
> Command Prompt. Type tracert and hit enter. This process is called tracing route to a website.

Internet Security
I would like to thank Anonymous alias JB for the most of the documentation below.
Read all the information below to be able to complete your assessment task for this unit.
Protect Fixed Internet Connection and IP Address
The IP address is always visible to the outside world. Internally, you can reduce its visibility for non-technical persons but not eliminate knowledge of the address.
- Security updates on server/gateway.
Security exploitation is commonplace today and so it is essential that security patches for gateway machines are kept current.
- Only gateway devices should have public IP addresses, not internal network computers, which should be on a private network address scheme.
Use and Maintain Antivirus Software
It is paramount to not just have Antivirus software installed, but to maintain currency .
Read: Internet Security GCF Learn Free
Protect Shared Network Resources From Intrusion
Sharing is the primary productivity benefit of networking. We have to share resources on the network such as printers and file folders in order to be productive. Some of those resources might be shared outside the local network (eg the incoming mail server) but most local network files and hardware are not meant for use outside the organisation and need to be protected. This may also include computerised machine tools used in manufacture and the building air-conditioning and lighting which may be computer controlled.
TCP/IP is the modern network topology. A key feature of the protocol is that different types of traffic (eg Email, web, telephone) are sent to different ‘ports’. There are 65535 Ports available of which the first 1024 are reserved. Of these 1024 reserved ports, only the first 256 are in common use. That means there are tens of thousands of potential gateways into your network that are not in active use. From a security point of view, these open ports are like open doors to a building, with one important difference. Although they are open, there may not be anything on the other side of the door (an empty room). However, Trojans exploit these ports for communication and open ports are a leading cause of the spread of DDOS and other security threats. The primary function provided by all Firewall services is to control the range of open ports. Only those ports intended to be available for use should be open on the firewall. (Note: KANGAN does not seem to apply this restriction.)
-
Firewall
It is necessary to protect the interface between the local network and the internet by the use of a Firewall. A Firewall will allow management of what links (protocols/ports) are available between the local network and the internet. For example, it would be possible to only allow Email traffic.
A Firewall may either be software running on the gateway or most likely today an Appliance that sits between the Gateway and the Internet. The advantage of an Appliance is that it is purpose built for managing security risks.
-
Password Strength
Weak passwords are the single most common cause of security failure.
Read: Passwords: The First Step to Safety GCF Learn Free
Following Security Protocols
Ensure that personal computer protocols and preferences follow security protocols. (Too many uses of the word protocol here and with different nuances of meaning).
- As the risk of an unexpected new threat is always there, it is essential that there are rules for how information about the internal network is managed. These include, establishing minimum password lengths and types, where business files are saved and how or if visitors are allowed any computer access.
- Ensure that all staff understand security issues and in particular the role of HTTPS in creating secure data links; how to handle suspicious email and what to do if they suspect their computer is infected by a virus or otherwise compromised.
- Ensure that processes exist to install and maintain Antivirus on all workstations.
- Induction program for new staff on computer security and use procedures.
Disable Control Protocol
Disable control protocol or internet protocol bindings for file and printer sharing. (This is not relevant to modern Windows releases which implement security over file and printer access on the TCP/IP network.)
- When a computer is directly connected to the internet, (e.g. at Home) shared printers and shared files are exposed to the internet and this can be exploited, particularly if passwords on the files/printers do not exist or are weak. At home, disabling file and printer sharing would prevent sharing of things such as iTunes on the local network. The better strategy is to make sure you have very strong passwords on the printer and file shares.
- Do not disable or uninstall File and Printer sharing on a Business network. Disabling this will mean that the network cannot operate effectively in sharing data and services, which is its main purpose. In commercial environments (e.g. Kangan), TCP/IP is usually the only network protocol in use and the gateway server/appliance is the first level of defence against outside access. Most modern networks store shared files only on the server with robust security measures controlled by the server software.
NETBIOS and TCP/IP
Ensure that network basic input/output system (NETBIOS) over TCP/IP is disabled.
NETBIOS is a network Applications Programming Interface (API) that was used prior to Windows 2000 / XP to identify the individual computers on the network. Essentially it was the means by which data was directed across the network, by applications, to the computer that required it. It is not really a network protocol as such, more like a utility that software can implement to communicate between machines. It is not secure as it was developed in the context that the network was ‘trusted’ and only local (not internet exposed). NETBIOS is easily exploited to gain unauthorised access.
- NETBIOS exists by default in all Windows releases using TCP/IP, including Windows 8. NETBIOS should not be implemented on any current systems and must be disabled.
- You can disable NETBIOS using Group Policy on the Server or by individually disabling under Control Panel/ Local Network Connections / TCP/IP Advanced Settings / WINS
When Windows 2000 / XP first came out, NETBIOS was required to allow for some applications to work across networks that also had Windows98 machines. Those applications and services that depend on NetBIOS over TCP/IP no longer function once NetBIOS over TCP/IP is disabled.
Assessment Task
Please download the assessment task here (on Wednesday) and upload to MyKangan.
Feedback
Please leave your feedback in form of a comment. Your feedback and suggestions will help me to make this blog more user friendly. Thanks!
Analyse Information + Assign Meta Tags – Week 6

- Photo by dhester on morgueFile.com
Link to all Weeks Week 1 Week 2 Week 3 Week 4 Week 5 Week 6
Content:
- Complete a Tutorial
- Lines in Photoshop
- Feedback
Complete a Tutorial
Select a tutorial from below, complete it, add meta-data to the PSD file. Save as a JPEG and email a copy to me(with all relevant meta-data).
Lines in Photoshop
As we saw last week working with lines can be a lot of fun and create very dynamic results. Photoshop has many interesting options on using lines. Particularly the many effects that are part of Photoshop can lead to stunning results.
Windows Vista Aurora Effect – a good and reasonably easy to follow tutorial by a favourite site of mine: Tutorial9.

Luminescent Lines – this tutorial from a great Photoshop tutorial site – PSD Learning – looks at customising brush dynamics. Fun to do and an interesting start: use a photo to create a suprisingly abstract and attractive background. A good tutorial to try on your own.

Gentle Curves of Pure Light – follow the tutorial from PhotoshopEssentials in class to create gentle curves with the pen tool and turn them into bright light.

Abstract Background – this is a more basic tutorial from YourPhotoshopGuide. It is good to introduce the Lens Flare filter and makes good use of the Free Transform and copy layer options.

Wavy Blackberry Style Wallpaper – this is a great tutorial from psdtuts+. It consists of 16 steps, but the result is convincing and you will learn a few good techniques on how to work with gradients and how to add depth to your work.

Lines Tutorial – follow the in-class instructions to create an image like the one below. I basically used the Brush tool and drew straight lines. Next I multiplied layers (Ctrl+J) and changed the layer blending mode.
I added a photo, in the example a photo of Grace Kelly and masked selections.

photo: courtesy of GettingCheeky.com and curved lines wallpaper: courtesy of FreeFever.com
Other links with many excellent tutorials:
40 Cool Abstract and Background Photoshop Tutorials – by Hongkiat Lim
25 Useful Photoshop Background Tutorials | Vandelay Design Blog
Feedback
Please leave your feedback in form of a comment. Your feedback and suggestions will help me to make this blog more user friendly. Thanks!
C1 – Design Simple Webpage Layouts – Week 07
Link to all Weeks Week 1 Week 2 Week 3 Week 4 Week 5 Week 6 Link to this Unit on MyKangan
Today’s Class
- Assessment – Website
- Four Web Pages
- Step 1 Brainstorm Ideas
- Step 2 Research Content
- Step 3 Storyboard
- Step 4 – Create the Website
- Design and Layout
- Guide to Good Web Design
- Dreamweaver
- Feedback
Assessment Website
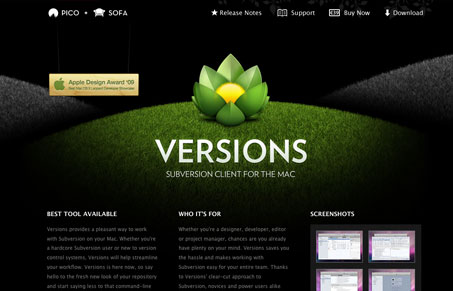
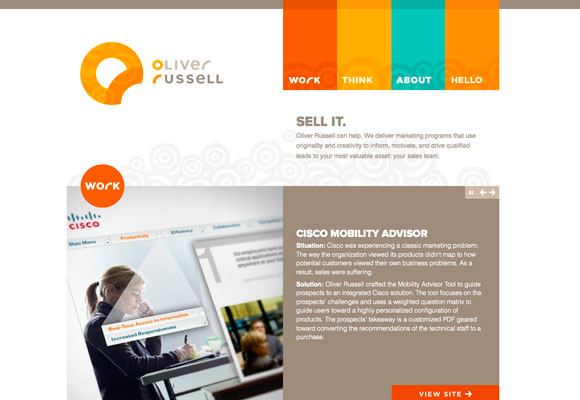
Today we will commence on your assessment for this class. You will need to design a website for a client to promote his work or services. See examples below as a result of an in-class brain storm:
- Portfolio of a designer, web-designer, graphic designer, fashion designer, …
- Portfolio of an artist or illustrator
- Portfolio of a photographer
- Website for a horse trainer
- Website for a singer
- Website for a humanitarian organisation, eg Doctors Without Borders
- Website for a restaurant
Four Web Pages
You will need to create 4 web pages using Dreamweaver or a WYSIWYG (What you see is what you get) code editor. These are the pages for you to create:
- Home Page
- About us and Contact
- Gallery or Portfolio of Work
- Bookings or Purchase Requests
Step 1 – Brainstorm Ideas
Brainstorm ideas for a website (if portfolio for a photographer, what type of photographer, wedding, portrait, famous photographer, …)
Step 2 – Research Content
Go online and research what content you can find for your website. Use Creative Commons sites whenever possible:
Otherwise use Google and add Creative Commons to your search criteria.
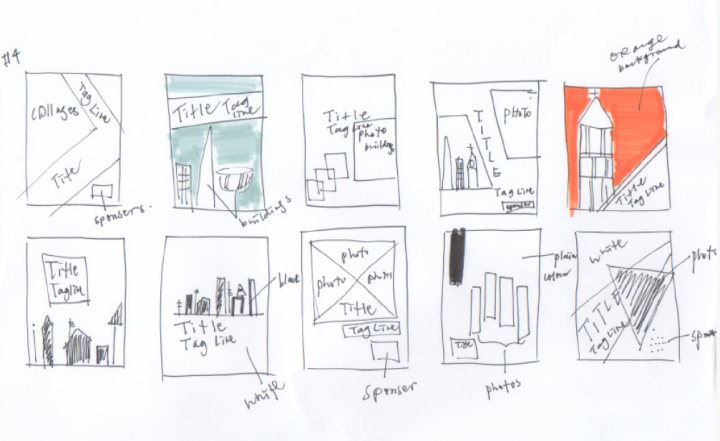
Step 3 – Storyboard
Create a storyboard for the website. Before you can create the storyboard you will need to organise all the different elements. Please refer to the Storyboard Workshop from Tuesday:
Storyboarding for Web Designers
Webdesigners benefit from storyboarding. It helps organising content and ensures that every element is included in a logical place according to topic and site.
Read the post on Storyboarding Your Website (Source: nmasse.com).
Storyboard Template
You can use the template below (a modified version of one found on Google Docs Public Templates) :
Step 4 – Create the Website
Create the website in Dreamweaver (or any other Code editor) using HTML, CSS and if necessary JavaScript or JQuery.
Your website needs to have a well-designed layout
Attend class to learn about how to set up your website in Dreamweaver. You will learn how to create divs, place images, create an interactive menu and more.
Design and Layout
Here are some important standards to consider for a convincing, well-communicated web page:
- Clarity is vital (Link to post on IWantClarity.com)
- Less items on page – make sure to use white space excessively
- Design should guide the user to information
Please view the PowerPoint show by Sara Ryan on Vic Costello’s ‘Multimedia Foundations –
Core Concepts for Digital Design’: Multimedia Foundations
Guide to Good Web Design
- Use Design to guide user’s eye to the information.
- Keep the layout simple and uncluttered.
- Use consistent navigation bar throughout the site.
- Organize text material in clearly defined groups.
- Be consistent, clear and concise.
- Stick to standards used on web (Accessibility)
- Do not include essential information on roll-over images.
- Include a contact option for the user, this could be:
- A Help Desk Number to a live person.
- A context sensitive ‘HELP’ button.
- An e-mail ‘Ask a Photographer’ or ‘Ask an Accountant’ or ‘Ask an Expert’ option.
Dreamweaver
Today you will learn how to create divs and add colour to them.
Feedback
Please leave your feedback in form of a comment. Your feedback and suggestions will help me to make this blog more user friendly. Thanks!
Workshop 1 – Create Storyboards
Today’s Class
- Introduction
- Storyboarding for Multimedia
- Day 1 Task
- Storyboarding for Webdesigners
- Storyboard Templates
- Assessment Task
- Feedback
Introduction
This workshop is about creating storyboards. A storyboard is a number of drawings, descriptions and annotations that help organising a story visually.
A storyboard is helpful in establishing a number of steps within a story. It will support you in organising the elements and give your story a clear focus.
Storyboards are used in a number of fields and industries:
- film and TV
- animation
- choreography
- theatre
- dance
- opera
- web design
- game design
- writing
- other multimedia fields
Storyboarding a film is quite different from storyboarding a website.
Storyboards can be created using software or it can be created with pen and paper.
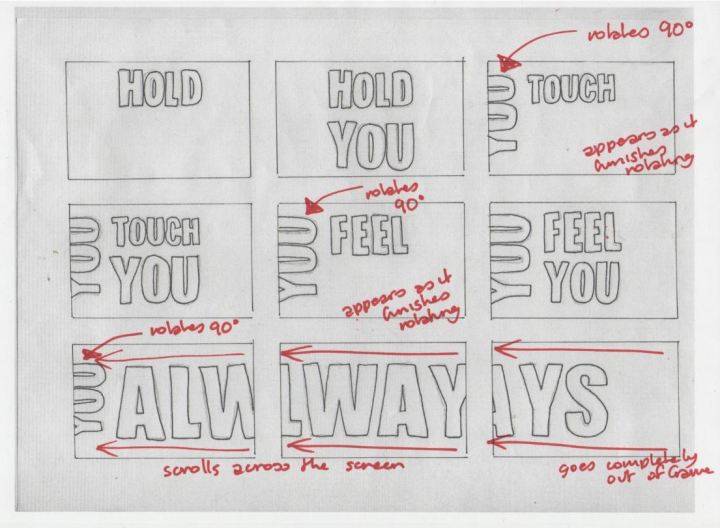
Pen and Paper
When you create a storyboard on paper I recommend to use colours and plenty of annotations.
Software
Most software packages will allow you to create storyboards:
- Adobe Photoshop
- Adobe Illustrator
- Corel Draw
- MS Word
- MS PowerPoint
There are also some specialised software packages for creating storyboards:
- StoryBoard Artist Studio
- StoryBoard Pro
- Inspiration
There are also numerous websites that allow you to create storyboards:
Storyboarding for Multimedia
Please follow the link below and read How to Do a Rough Storyboard by Jane Stevens.
After reading the post please complete the task below.
Day 1 Task
Please open the file and complete in class: Day 1 Task – Create Storyboard
Storyboarding for Webdesigners
Webdesigners benefit from storyboarding. It helps organising content and ensures that every element is included in a logical place according to topic and site.
Read the post on Storyboarding Your Website (Source: nmasse.com).
Storyboard Templates
Below are a number of links for storyboard templates:
Search Google Docs for Templates
Storyboard template (Courtesy of http://www.cwrl.utexas.edu )
Assessment Task
The assessment task will be included in (clustered with) C1 – Design Simple Website Layouts.
Feedback
Please leave your feedback in form of a comment. Your feedback and suggestions will help me to make this blog more user friendly. Thanks!
E-Learning and Games – Week 4

Link to all Weeks Week 1 Week 2 Week 3 Week 4 Week 5 Week 6
Content:
- Game Mechanics
- Brainstorm Game Mechanics
- Assessment 2
- Feedback
Game Mechanics

Game mechanics are at the core of a game and decisive for game play. Good engaging game mechanics will make a game fun to play or challenging and as well rewarding.
Game mechanics can be found in board games (Chess, Backgammon, Jenga) and for board games we often refer to core mechanics. Examples are:
- Role Playing (Charades)
- Capture & Eliminate (Chess)
- Pattern Recognition (Chess, Rush Hour)
- Memory (Memory)
- Dice Rolling (Monopoly)
- Find the extensive list below at: BoardGameGeek.com
| Acting | Action / Movement Programming |
| Action Point Allowance System | Area Control / Area Influence |
| Area Enclosure | Area Movement |
| Area-Impulse | Auction / Bidding |
| Betting / Wagering | Campaign / Battle Card Driven |
| Card Drafting | Chit-Pull System |
| Co-operative Play | Commodity Speculation |
| Crayon Rail System | Deck / Pool Building |
| Dice Rolling | Grid Movement |
| Hand Management | Hex-and-Counter |
| Line Drawing | Memory |
| Modular Board | Paper-and-Pencil |
| Partnerships | Pattern Building |
| Pattern Recognition | Pick-up and Deliver |
| Player Elimination | Point to Point Movement |
| Press Your Luck | Rock-Paper-Scissors |
| Role Playing | Roll / Spin and Move |
| Route / Network Building | Secret Unit Deployment |
| Set Collection | Simulation |
| Simultaneous Action Selection | Singing |
| Stock Holding | Storytelling |
| Take That | Tile Placement |
| Time Track | Trading |
| Trick-taking | Variable Phase Order |
| Variable Player Powers | Voting |
| Worker Placement
|
Video games use game mechanics as well, but besides the core mechanics they are more related to aspect of digital technology.
Find an extensive list of game mechanics at Wikipedia.
We can and should list game mechanics to be able to select what game mechanics we like, but at the end of the day we need to be able to apply game mechanics to a game. This need to happen in the context of the game’s overall purpose. We will read this post: Game Mechanics and Gamification by Andrzej Marczewski on Gamasutra together to get a better idea about how to apply game mechanics.
Brainstorm Game Mechanics
We will do a brainstorm in class for potential game mechanics for the ABC learning game for children (assessment).
Look at this list of Motivators and Supporters (as found on Gamasutra’s post Game Mechanics and Gamification – link is above):
| Motivators | Possible Supporters |
| Autonomy | Customisation Choice Freedom |
| Mastery | Levels Challenges |
| Purpose | Giving / Altruism Narrative Greater Meaning |
| Status | Leaderboards Achievements |
| Social Connections | Suggest similar users Cooperative “play” |
| Rewards | Points Badges Achievements |
| Peer Pressure | Peer review / feedback / grading systems Boasting / Bragging system Competitive “play” |
| Avoidance | Lose Points Lose Status Game Over |
| Scarcity | Exclusive / Unique Rewards Reward Schedules |
| Fun! | Real Games Quiz’s Competitions |

Use 3 motivators from the list above and brainstorm game mechanics for the e-game for your assignment (prep-children recognising letters of the alphabet).
List the factors:
- Desired Behaviour (eg blow away sand to reveal a letter – find the same letter in a list of letters and click on it)
- Motivation (Mastery: Learning the letters of the alphabet; Status: receiving a badge, star, completing a level)
- Supporters (for mastery: being able to read; for status: having your score displayed, completing a series – eg a series of green frogs)
Assessment 2
Feedback
Please leave your feedback in form of a comment. Your feedback and suggestions will help me to make this blog more user friendly. Thanks!


![The concept was used on the German side as well with this 'Auch du sollst beitreten zur Reichswehr' [You too should join the German Army], design by Julius Engelhard, Image: courtesy of mental_floss](https://classoffederico.files.wordpress.com/2014/04/world-war-propaganda_auch-du-sollst-beitreten.jpg?w=264&resize=264%2C336#038;h=336 "world war propaganda_Auch du sollst beitreten")


